Thursday, January 5, 2012

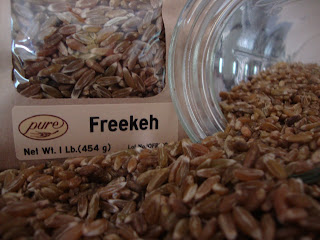
Cayuga Pure Organics' Freekeh Grits

I have been experimenting again with Cayuga Pure Organics' freekeh.  Just to remind everyone, CPO freekeh is an immature spelt berry that is harvested young and roasted in its hull producing a smoky tasting grain.  It enhances any meal experience and makes a great conversation piece.

I came up with a recipe using freekeh in a savory brunch style dish by cracking the grains in a spice grinder and cooking them like grits.  Why should corn be the only grain allowed in grits!?  Then I put the grits in greased baking pan and let them set overnight in the refrigerator.  The next morning I cut the freekeh grits into squares.  I then prepped some Side Hill Acres' raw goat milk cheddar, Good Life Farm winter greens, and an egg from Solona Farm.  In a hot cast iron skillet, with a touch of sunflower oil, I seared the freekeh grit cakes until golden brown on both sides and then cracked the egg into the hot pan.  I topped the grit cakes with some of the goat milk cheddar and put the pan under the broiler until the the cheese was melted and golden brown.  To serve, put one grit cake on a plate and place a handful of greens on the cake, drizzle with some oil and vinegar (or any dressing you have on hand), place another freekeh grit cake on top and then the egg, finish with a touch of sea salt and a healthy pinch of fresh ground black pepper.  This dish is a great example of how to use leftover cooked grains and turn them into another fine dining experience. 

Here is the recipe for the freekeh grits...enjoy!


CPO Freekeh Grits/ Grit Cakes
By Hans Butler
Ingredients
1 cup CPO freekeh
1 Tbsp sunflower oil
¼ cup onion – small dice
Sea salt – to taste
Black pepper – to taste
3 cups water
Directions
1)      Crack the freekeh in a spice grinder and soak in water for 1 hour, drain and reserve
2)      Heat sunflower oil in a pot, add the onions, salt and pepper, sauté until golden brown about 2 minutes
3)      Add freekeh to the pot and sauté for about 1minute, add water, season again with salt and pepper, and bring to a boil, cover and simmer for about 30-45 minutes until the freekeh has a creamy porridge style consistency
4)      To make grit cakes, grease an appropriately sized cookie sheet and layer with the warm grits, refrigerate for at least 2 hours or overnight – to serve, cut into desired size and shape, pan fry

Yields 4-5 servings


Thursday, December 22, 2011

Orange-Spiced CPO Farro Pudding

I really like using Cayuga Pure Organics farro in savory dishes, but it's also nice to see this whole grain make an appearance in a dessert.  I like the challenge of incorporating the grain in it's whole form, rather than using the flour from the whole grain.  I started looking at rice pudding recipes and decided that farro pudding would be a great locally sourced dessert.  Finally I came up with my version of farro pudding, this one is appropriately spiced for the holiday season!


Orange-Spiced Farro Pudding w/ Caramelized Apples
By Hans Butler
Ingredients
1 cup farro – soaked for 1 hour
1 orange - zested and juiced
1 pinch of salt
½ inch knob of ginger – peeled and grated
½ tsp ground clove
½ tsp ground cinnamon
½ tsp ground allspice
2 cups water
2 cups heavy cream
½ cup maple syrup
2 egg yolks - whisked

3 Tbsp Butter
2 cups apples – ¼ inch dice
1 pinch of salt
freshly grated nutmeg
3 Tbsp Honey
2 Tbsp Cider
Directions
1)      Drain farro and put in a heavy bottomed sauce pot
2)      Add orange zest, orange juice, salt, ginger, clove, cinnamon, allspice, and water
3)      Bring to a boil, cover with a lid and simmer until most of  the water has evaporated
4)      Whisk together heavy cream and maple syrup, add this mixture to the farro
5)      Simmer for about 20 minutes until the cream starts to reduce and the pudding starts to get very thick
6)      At this point whisk about ½ a cup of the hot liquid in the bowl with the egg yolks, this is called tempering, then add the warmed up egg yolks to the pudding mixture while whisking continuously
7)      Heat this mixture, stirring every few seconds, for about another 5-10 minutes – the mixture should be barely simmering during this time
8)      Cool to room temperature and then chill in the refrigerator for a couple of hours (or serve warm)
9)      While mixture is cooling, heat a sauté pan over medium-high heat
10)  Add butter, when the butter has melted and is sizzling add the diced apples and a pinch of salt and a bit of freshly grated nutmeg, quickly toss them around in the pan to coat with butter
11)  Add the honey toss the apples in this mixture until the honey is full melted and bubbly (only takes about 5-10 seconds)
12)  Remove apples with a slotted spoon and place them in a clean bowl, add the cider to the mixture remaining in the pan and cook until golden brown and syrupy
13)  Add this mixture to the apples and toss to coat, this is basically caramelized apples
14)  Serve the desired amount of pudding in a dish and garnish with some caramelized apples
Yields 3-4 cups


Cayuga Pure Organic's farro for farrotto!

Cayuga Pure Organics is one of the few growers of farro in the United States.  Farro is emmer, one of the oldest varieties of wheat that grows wild and was first cultivated in the Near East. This grain was used in bread and beer in Ancient Egypt and is one of five acceptable grains that can be used in matzah during passover.  Farro is often used to describe other grains such as spelt, barley, and einkorn; incorrect translations of literature contribute to this misnomer. 

I enjoy using CPO's farro in many dishes, it holds up better than rice in soups and imparts a nutty sweetness and pleasant chewiness.  Italian cuisine has farrotto, a risotto style dish using farro.  I find that it works best to crack the grain gently in a spice grinder or food processor, this helps release the starch to create that creamy risotto like texture.  I've created a nice mushroom farrotto recipe, using wonderful Double E Farms shitake mushrooms and CPO's farmer fresh farro!  Serve this as an awesome side dish or main dish at you holiday table this season!

Shitake Mushroom Farrotto
By Hans Butler
Ingredients
1 cup CPO farro
2 Tbsp sunflower oil (reserve half for sautéing mushrooms)
1/2 cup onion – diced (reserve half for sautéing mushrooms)
2 cloves of garlic – minced (reserve half for sautéing mushrooms)
Salt and pepper- to taste
½ tsp thyme- dried
2 Tbsp porcini powder
¼ dry white wine
1 Meyer lemon- zested and juiced
4-5 cups stock – kept warm on the stove

1 Tbsp unsalted butter
7-8oz Double E Farm’s shitake mushrooms – stems removed and minced, caps halved
Salt and pepper- to taste

¼ cup Toma Celena cheese- grated
Directions
1)      In a spice grinder or food processor gently crack the farro, rinse and soak farro for 1 hour.
2)      Heat a medium sized pot over medium high heat and add the drained farro, dry the farro in the pot and stir intermittently to toast the grains
3)      Add oil, ¼ of diced onions, 1 minced clove of garlic, minced shitake stems, salt and pepper, and thyme – sauté over medium heat until the onions are golden brown (about 1 minute)
4)      Add porcini powder, wine, and lemon zest – cook until the wine has evaporated
5)      Add 1 ½ cups of heated stock and adjust heat to just below medium, stirring occasionally.  When the stock has been absorbed add another ½ stock and repeat this process until the farrotto has absorbed most of the liquid and has a creamy and chewy texture – almost like very thick porridge
6)      Heat a sauté pan over medium high heat, add butter and reserved sunflower oil
7)      When the oil is hot and the butter melted add reserved onions and garlic, sauté until golden brown (about 1 minute)
8)      Add the halved shitake mushroom caps and season with salt and pepper, sauté until the liquid released from the mushrooms has evaporated and remove from heat
9)      Add ½ the lemon juice to farrotto, taste and adjust seasoning- you may want more lemon  juice, salt, or pepper
10)  To serve put desired amount of risotto on a plate, top with the sautéed shitake mushrooms and a sprinkle of grated cheese.

Yields 3-4 cups


Friday, August 12, 2011

POLENTA PIZZA PARTY AND KEFIR MADNESS

It just so happens that there is some wonderful coarse-ground polenta grown and ground at Farmer Ground Flour here in Upstate NY.  This polenta has great texture and is bursting with enormous corn flavor; it works great for soft polenta, or a set polenta suitable for grilling or broiling.

I decided to do a polenta pizza for a summer time class at Ecovillage; this is a great alternative to a wheat based crust and is a vehicle for most seasonal ingredients.  I also used Cayuga Pure Organics' black beans as one of the toppings; a great local ingredient available year round.  Black beans, as well as many other Cayuga Pure Organics' beans, look and taste delicious as a topping to any kind of pizza.

Another great resource that needs some attention is Finger Lakes Dexter Creamery's kefir cheese; this raw milk cheese is bursting with flavor and some serious culture.  As far as I know this is the only farm producing a natural-rind raw-milk kefir cheese packed with probiotics; they have many different varieties, each with a unique flavor that has been influenced by temperature, time, and PH levels.  For one of the pizza toppings I decided to use their "Kefir Gold"; a grated version of their cheese that is reminiscent of a good Parmesan and Romano cheese that has been blessed with the complexity of a cosmos, it also has a pleasant nutty finish!

Here's a few pictures for your eyes to nibble on!


Polenta set and chilled, ready to get toasted!


The vegan:  summer squashes, oil-cured olives, heirloom tomatoes, capers, garlic


The Vegetarian:  CPO black beans, basil, heirloom tomatoes and ....


KEFIR MADNESS!!!


Melted Kefir Gold + Black Beans + Veggies + Polenta = A Tasty Locally-Sourced Summer Meal!


Polenta Pizza with Summer Squash, Tomatoes, Oil-Cured Olives, and Capers
By Hans Butler


Ingredients
1 ½  qt veg stock or water
1 oz extra virgin olive oil
Salt and pepper, to taste
2 cups Farmer Ground Polenta

1 lb tomato, cut in ½ pieces
10-12 oz summer squash, sliced thin
2 Tbsp oil-cured olives, minced
2 Tbsp capers
1 Tbsp garlic, minced
2 Tbsp extra virgin olive oil
1 Tbsp balsamic vinegar
Pepper, to taste
Directions
1)Bring stock to a boil and add oil, salt and pepper, and polenta; make sure to stir constantly to thoroughly incorporate the polenta
2)Lower heat once the polenta comes to a simmer, stirring every few minutes for 25-30 minutes, until the polenta is very thick and pulling away from the pan, adjust the seasoning if necessary, remove from heat
3)Lightly coat a ½ sheet pan (12”x 17”) with olive oil and spread the polenta evenly over the whole pan, let it chill for at least 30 minutes in the refrigerator
4)Crisp the top of the polenta under a broiler for a few minutes or in a 450 degree oven, just until golden brown
5)Sprinkle a couple teaspoons of salt over the sliced squash and let drain in a colander for 20-30 minutes; you can also press down firmly on the squash to help release some of the liquid
6)Mix the tomatoes, squash, olives, capers, garlic, oil, vinegar, and pepper; evenly distribute over the top of the crisped polenta
7)Put under the broiler for a few minutes or a 425 degree oven for about 25-30 minutes to crisp the toppings slightly and heat the pizza through, cut into squares and serve

Makes 20 - 6oz servings  


Polenta Pizza with Black Beans, Basil, Tomatoes and Kefir Cheese
By Hans Butler


Ingredients
1 oz olive oil
2 oz garlic, sliced
Salt and pepper, to taste
1 ½  qt veg stock or water
2 cups Farmer Ground Polenta

½  lb tomato, cut in ½ pieces
2  c cooked CPO black beans
1 c basil , julienned
2 Tbsp extra virgin olive oil
1 Tbsp balsamic vinegar
Salt, to taste
Pepper, to taste

6 oz kefir cheese (kefir gold)
Directions
1)Heat a large heavy bottom pot over medium heat, add oil
2)When butter is melted add sliced garlic and saute gently
3)Season with salt and pepper, and add the stock
4)Bring stock to a boil and add the polenta, stirring constantly
5)Lower heat once the polenta comes to a simmer, stirring every few minutes for 25-30 minutes, until the polenta is very thick and pulling away from the pan, adjust the seasoning if necessary, remove from heat
6)Lightly coat a ½ sheet pan (12”x 17”) with olive oil and spread the polenta evenly over the whole pan, let it chill for at least 30 minutes in the refrigerator
7)Crisp the top of the polenta under a broiler for a few minutes or in a 450 degree oven, just until golden brown
8)Mix the tomatoes, beans, basil, oil, vinegar, salt and pepper; evenly distribute over the top of the crisped polenta
9)Sprinkle cheese evenly over the other toppings, return to the broiler or 425 degree oven to crisp the toppings slightly and heat the pizza through, cut into squares and serve

Makes 20 - 6oz servings   

Thursday, July 21, 2011

Upstate NY-Breakfast of Champions

Just a quick idea for a nice energy packed breakfast, guaranteed to give you sustainable nourishment to start the day.

First: you must rinse and soak some CPO Live Oat Groats overnight; changing the water every 6 hours is a good idea...especially in the Upstate NY humidity.

Second: you must sprout the oats for 2-3 more days; rinsing every 4-6 hours (or at least as often as you can remember, especially in hot weather)...sprout in a quart size mason jar with a clean cloth and rubber band secured to the opening, lay the jar on its side to increase surface area, sprout out of direct sunlight at room temperature until you get something that looks like this:


Third: purchase some CPO Chef Hans' 5-Spice Black Bean Spread (or another flavor) @ the Ithaca Farmer's Market, Green Star, Ithaca Coffee Company, or Bet The Farm.


Fourth: put a handful of sprouts on a plate, top with about 2 Tbsp of bean spread, poach a couple of eggs and place on top, drizzle with some sunflower oil, sprinkle with some cracked black pepper and a pinch of sea salt:


ENJOY!


Tuesday, July 5, 2011

Freekeh and Jacob's Cattle Beans with Moroccan Flavors

Preserving your own citrus is quite simple.  Take a lemon, lime, or orange and place the bottom or top end on a cutting board; cut the citrus in fourths, but not all the way through, leave it attached on one end; pack each piece of citrus with 1 heaping Tbsp of sea salt and close it shut so that it resembles its whole form; tightly pack each piece of fruit into a jar and let it sit covered at room temperature for 4-5 days; now squeeze enough fresh citrus juice to cover the fruit and let it sit covered for at least 1 month at room temperature, make sure to weight the fruit down so that is stays under the liquid ( use a plate weighted down with a bag of the curing solution).  It will last for at least 1 year in a cool dark spot or in the refrigerator indefinitely.  To use clean out the meat of the citrus fruit and rinse it a bit under cool water.

Here's a nice grain and bean salad that will comfortably fill the belly as a nice lunch or accompany a nice piece of grilled lamb from a local farm.  The Moroccan flavor comes from some preserved citrus, oil-cured olives, mint (which is quite abundant in upstate NY), cinnamon, and star anise; I use a combination of apple-mint and spearmint.

Freekeh getting ready for a soak and steam bath...
...plump, sweet, juicy ... laced with a subtle smokey and nutty flavor profile.
Jacob's Cattle Beans beautifully mottled (also know as trout beans) getting ready to soak and simmer.
Just finished simmering and still looking quite beautiful...time for some Moroccan Flavors!


Preserved citrus in a jar of salty citrus juices...


...preserved lemon and orange: meat removed, rinsed, and ready for dicing.


The holy trinity: mint, preserved citrus, oil-cured olives!


Jacob’s Cattle Beans and Freekeh with Moroccan Flavors
By Hans Butler
Ingredients
1 Tbsp minced preserved citrus (rinds only)
1 Tbsp minced oil cured olives
1 cup julienned apple mint
1/4  cup fruit vinegar
1/4 cup Stolor Organics Sunflower Oil
1/2 tsp ground star anise
1/2 tsp ground cinnamon
2 cups cooked CPO Jacob’s Cattle Beans
2 cups cooked CPO Freekeh

Directions
1)Remove flesh, rinse, and dice the citrus very small; put in a large mixing bowl.
2)Dice olives into small pieces; add to the mixing bowl.
3)Julienne mint; add to the mixing bowl.
4)Add vinegar, oil, star anise, and cinnamon to the mixing bowl and mix well.
5)Add the beans and freekeh to this mixture; mix everything together gently, but thoroughly.
6)Enjoy as a side dish, a nice lunch, or a light dinner.

Serves 4-6


Tuesday, June 21, 2011

Adventures in Dorayaki

For some reason, I just can't get satiate my curious palate for using Cayuga Pure Organics' beans in confections.  I guess I'm just very excited about the fact that the beans used for making sweet paste are grown about 15 minutes from my house; it is also quite exciting to use beans in desserts. 

The dessert documented in this session is Dorayaki; a Japanese dessert consisting of sweet bean paste sandwiched between two pancakes.  Most importantly, most of the ingredients have been sourced from Cayuga Pure Organics and other local farms.  CPO's Paradise Pancake Mix was created by Vanessa, who works for CPO in sales and manages the farm's stand at the Ithaca Farmer's Market.  The mix is really good for making some nice breakfast style pancakes, but it also works really well for making Dorayaki. 
Check out the consistency...this is what you're going for!


Happy Cast Iron Skillet : )

 
Time to flip!

Filled, Fun, and Flavorful!


Support your local farmers!


Dorayaki
By Hans Butler
Bean Paste Ingredients:
½ # CPO Red Merlot Beans
1tsp sea salt
¾ cup maple syrup

Pancake Ingredients:
1 cup FGF Paradise Pancake Mix
3 eggs
3/4 cup water
2 tbs buckwheat honey

Bean Paste Directions:
Soak red beans 3-4 hours, rinse and cover with about 2qts of water, simmer for about 45 minutes and then add the salt and stir well; it’s okay to crush the beans, this is what you’re going for. Make sure to turn the heat down a little lower. At this point, the mixture will be very thick and pulling away from the pan when you stir.  It will be a very dark and rich color of red with an smell reminiscent of vanilla beans. This is when you add the sweetener.  Then turn the heat down to the lowest possible setting and stir and crush mixture until sweetener is fully incorporated.  If the mixture is too thick (dry looking) just add some more water(a couple tablespoons at a time) and bring to a simmer; it will thicken a lot more when cooled too, so keep it somewhat fluid.  Remove from heat, cool to room temperature, and refrigerate.

Pancake Directions:
Mix eggs, water, and honey together.  Slowly add the pancake mix to the wet ingredients.  Cook in a cast iron skillet over medium heat; cool to room temperature.  Now sandwich 2 pancakes together with the appropriate amount (depends the size of your pancakes) of bean paste.  Enjoy!